Version-verified guide
Valheim Portal Network Guide — Build, Tag and Design Your Fast-Travel Hub
Everything about Valheim portals: recipe and unlock, how tag matching works (with the 4-portal pairing rule), the complete teleportation-blocked items list, what the Portal Stone changes, and how to design a usable hub network.
By Valheim Field Guide Editorial Team
Portals are Valheim’s closest thing to fast travel
Valheim has no teleportation hub, no skill-based fast travel, and no “return to base” button. Portals are the only reliable way to turn a 20-minute sail or a cross-continent run into an 8-second loading screen. Once you can craft them, every major base, boss stone, mineshaft and dungeon becomes reachable in seconds — which is why planning your portal network is one of the highest-leverage decisions you can make after Eikthyr.
Please accept cookies to enable this feature.
The portal recipe — and why unlocking it takes time
The portal recipe unlocks when you pick up one of each of three materials for the first time: Finewood, Greydwarf eye, and Surtling core. None of them come from the same place, which means you will reach the Black Forest and survive your first Swamp before you can build your first pair.
| Material | Amount per portal | Where to get it |
|---|---|---|
| Finewood | 20 | Birch and oak trees in the Meadows (requires Bronze Axe or better — Flint Axe does not drop Finewood) |
| Greydwarf eye | 10 | Dropped by Greydwarves; most densely in the Black Forest, but also spawns in the Meadows at night |
| Surtling core | 2 | Chests and pedestals inside Burial Chambers (Black Forest), or from Surtlings themselves (Swamp) |
Two portals = one working link. Double every number above before you go farming. Pack a spare Workbench — it costs 10 Wood but lets you place the second portal wherever you end up.
Workbench requirement: A portal must be placed within a Workbench’s build radius. After it is placed, the Workbench can be disassembled — the portal keeps working independently. This is useful for mobile portal construction in unexplored areas.
Tag matching — how portals decide which pair links
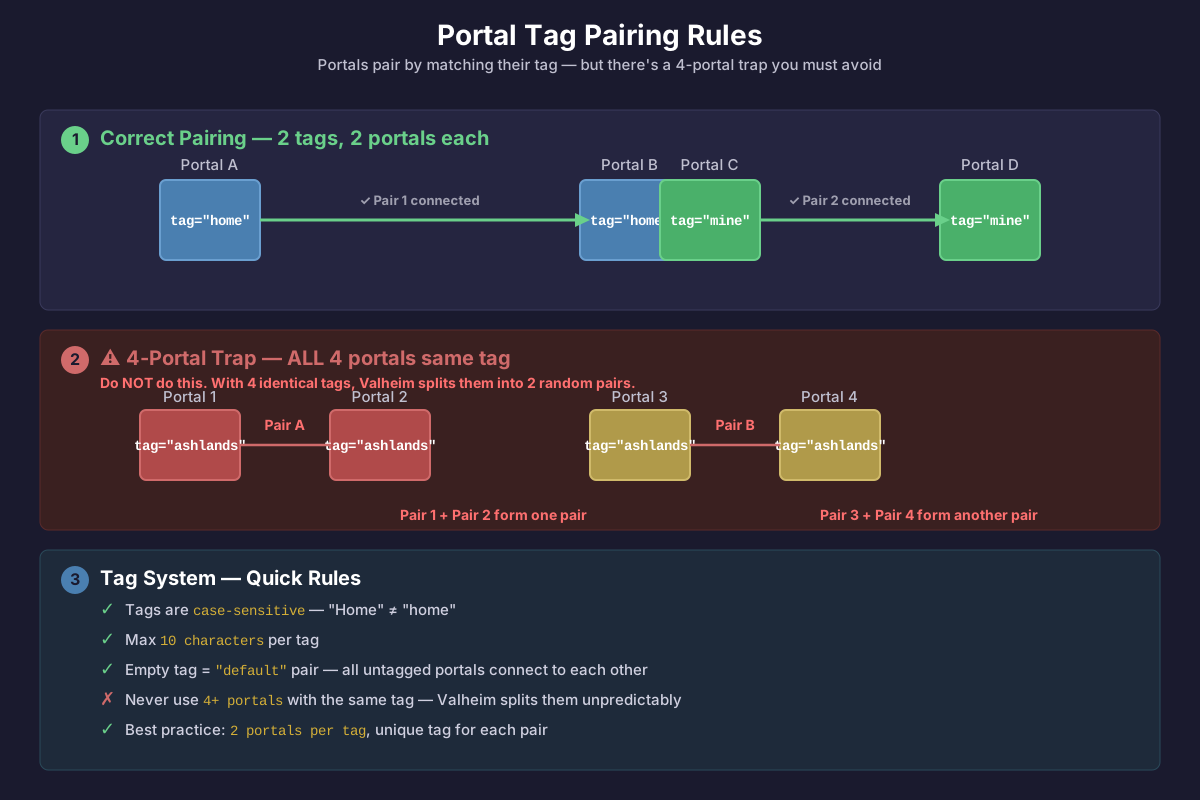
Every portal has a case-sensitive text tag. Two portals with the exact same tag (matching capitalisation, no trailing spaces) connect automatically. Walking into one teleports you to the other.
The four-portal pairing rule
If you have more than two portals with the same tag, they pair up in the order you set the tags:
- Tag 1 → Tag 2
- Tag 3 → Tag 4
If you have six portals with tag “explore”, portals 1-2 pair, 3-4 pair, 5-6 pair. Portal 1 never connects to portal 3, and no portal ever connects to more than one other. This is a frequent source of “why won’t my portal work?” — players set three portals to the same tag expecting a hub, but only two pair and the third goes dark.
Tags are empty by default. Two portals both with no tag will pair automatically. This is fine for a one-link setup but terrible once you have three or more — always name your portals explicitly.
Tag limits: Maximum 10 characters per tag. Numbers, letters and special characters are all valid.
Portals that won’t connect — the failure checklist
If you build two portals, set matching tags, and nothing happens, run down this list:
- Trailing or leading space in a tag. The comparison is exact —
" home"and"home"do not match. Re-type both tags from scratch. - Wrong capitalisation.
"Swamp"and"swamp"are different tags. - Three portals with the same tag. Remove or re-tag the third.
- One of the portals is broken. Portals have 400 durability and are weak to chop damage. Greydwarves and wolves attack them on sight during raids.
- You built in a restricted area. Portals cannot be placed inside troll caves, burial grounds, boss stone sacrificial circles, or zones protected by the Ancient modifier.
The teleportation-blocked items list
Portals teleport your character, your horse, and everything in your inventory. But some items block teleportation — you will get a red error message and the portal will not activate as long as they are in your inventory or hotbar. These items are marked with a blue portal crossed in red on their icon.
What is blocked (standard portal)
- All ore and ingot types: Copper ore, Tin ore, Iron ore, Silver ore, Black metal scrap, Copper ingots, Tin ingots, Bronze ingots, Iron ingots, Silver ingots, Black metal ingots
- Flametal ore and ingots (Ashlands 1.0 new)
- Dragon egg — the largest single item you cannot portal with
- Hildir’s chests (1.0 new NPC containers)
- Dvergr extractor, Mechanical spring, Charred cogwheel — Mistlands / Deep North craft components
What is NOT blocked
- Wood, Finewood, Core wood, Ashwood, Timberwood (all wood types portal freely)
- Stone, Bronze, scrap metal (after smelting — the ingot version is blocked, but Stone and Scrap metal itself is not)
- All gear, weapons, shields, meads, food, trophies, Surtling cores, Greydwarf eyes
- Portable materials needed to build another portal (portal materials portal freely — which is why the mobile-portal trick works)
The Portal Stone exception (Ashlands, 1.0 new): The Portal Stone is a special portal variant that does let you carry blocked items through — including ore, ingots, Dragon eggs, Hildir’s chests and Dvergr extractors. It is crafted at a Stonecutter from 30 Grausten, 10 Greydwarf Eye and 2 Molten Core (the cores come from Putrid Holes and Charred Fortresses). Portal Stones and regular portals connect to each other — you can mix both types, though you can only carry blocked items in through the Stone side. Because it needs a Stonecutter to place rather than a Workbench, it is not a mobile solution — it belongs at fixed outposts that process metals.
Portal network design patterns
The standard pattern that players converge on after a few weeks:
1. Hub-and-spoke with a rename portal
At your main base, build a hub room with several portals. One permanent portal for each regular destination (Swamp, Mountain, Plains, Mistlands, Ashlands, Deep North, Merchant, Boss stones). Add one rename portal — a single portal that you re-tag whenever you want to reach a new outpost. This lets you build a portal at any random exploration site (“explore” tag), then retag your hub’s rename portal to match and connect instantly.
2. “Metal hub” at the ore bi-ome
The biggest logistics headache in Valheim is hauling ore back to base. The key fact is that neither ore nor ingots can pass through a regular portal, so a portal can only move you, not your metal. The most common solution is to build a metal outpost at each ore biome: a Workbench, a Smelter or Blast Furnace, a Chest and a regular portal for your own travel. You portal in from base with an empty inventory, mine the ore, and then either smelt it on-site and sail the ingots home by longship, or sail the raw ore back and smelt at home. Either way, the metal moves by ship — the portal only handles the player.
3. “Resource hub” at each gathering spot
Non-metal resources (wood, hide, food, berries, trophies, Surtling cores) all portal freely. Build a small portal at your wood farm, your berry patch, your hunting ground, and your Surtling core site. These save hours of back-and-forth sailing.
4. Under-cover placement for raid survival
Portals have 400 durability, are weak to chop damage (1.5x multiplier), and are targeted by raid monsters. Never build a portal outside without protection. Best practice:
- Place portals inside a stone-walled hub room with a single doorway.
- If you build outside, place them right next to a Workbench so enemies get distracted by the Workbench first.
- Use the portal hub room as your raid shelter — you can teleport back to a pre-saved safe location.
The mobile portal trick — essentials
Carry portal materials with you while exploring. When you find a new area you want to return to:
- Clear a 3x3 patch of ground for the Workbench.
- Place Workbench, then place portal beside it.
- Tag it something descriptive.
- Go back to base, re-tag your hub’s matching portal, and you are connected.
Total carry weight: ~52 (portal materials) + ~20 (Workbench) = 72. Light enough to keep in your inventory while exploring.
What to do before you start building your network
- Kill Eikthyr first. You need Bronze Axe to chop Finewood, and you need to survive the Black Forest to farm Greydwarf eyes and Surtling cores. Most players build their first portal pair around the time they beat The Elder.
- Lay out your hub room before placing anything. Portal placement is permanent (you can disassemble and move but they cost materials). Pick a flat spot near the edge of your base, inside a stone wall.
- Name your portals consistently.
home-swamp,home-mountain,home-plains— notportal1,portal2. - Do not put portals in the wind. Valheim’s wind direction affects your sail, but it does not affect portals — just use the pattern for non-moving resources.
Links
- building-basics — how Workbenches and the build radius work
- structural-integrity-deep-dive — why stone walls around your hub are the right call
- workstations — what the Stonecutter and other late-game stations unlock (Portal Stone requires Stonecutter)
- ocean — why you still need longships even with a portal network (ore hauling)
Related guides
- Valheim Base Design Ideas — Location, Layout and Raid-Proofing
Where to put your Valheim base, how to lay out a main hub versus an outpost network, and the design choices that survive raids, smoke, stability loss and long hauls.
Verified Valheim 1.0 - Valheim Building Basics — Stability, Materials and Layout
How Valheim building works: the stability colour system, wood versus core wood versus stone, and the core pieces every functional base needs.
Verified Valheim 1.0 - Valheim Furniture & Decor Guide — Storage, Stands and Rested Comfort
Everything Valheim furniture does besides look nice: storage capacity tiers, the new 1.0 item and armor display stands, how the Rested comfort bonus actually works, and what the 80+ new 1.0 build pieces add to a base.
Verified Valheim 1.0