Version-verified guide
Valheim Progression Guide — The Complete Path from Meadows to Deep North
The full 8-biome progression path of Valheim 1.0: when to leave each biome, what gear to have, where each boss altar sits, and the common traps that get new players stuck.
By Valheim Field Guide Editorial Team
Valheim’s progression is eight biomes and eight bosses in a fixed order
Your world is seed-generated: Meadows is always where you start, and each biome sits on its own landmasses at varying distances from spawn. The exact layout changes every seed, but the progression order is fixed. You can sail past biomes if you know where you are going, but the gear tiering and resistance mechanics force you through this order in practice. Skipping a biome means fighting a boss with the wrong weapons — or worse, the wrong resistances.
This page is the sequence. Each biome tells you what you need to have when you arrive, what you need to have before you leave, and the boss altar location.
The progression order
  Meadows → Black Forest → Swamp → Mountain → Plains → Mistlands → Ashlands → Deep North
  (Eikthyr)   (The Elder)    (Bonemass)  (Moder)   (Yagluth)  (The Queen)  (Fader)   (Kall Fimbulbringer)
Please accept cookies to enable this feature.
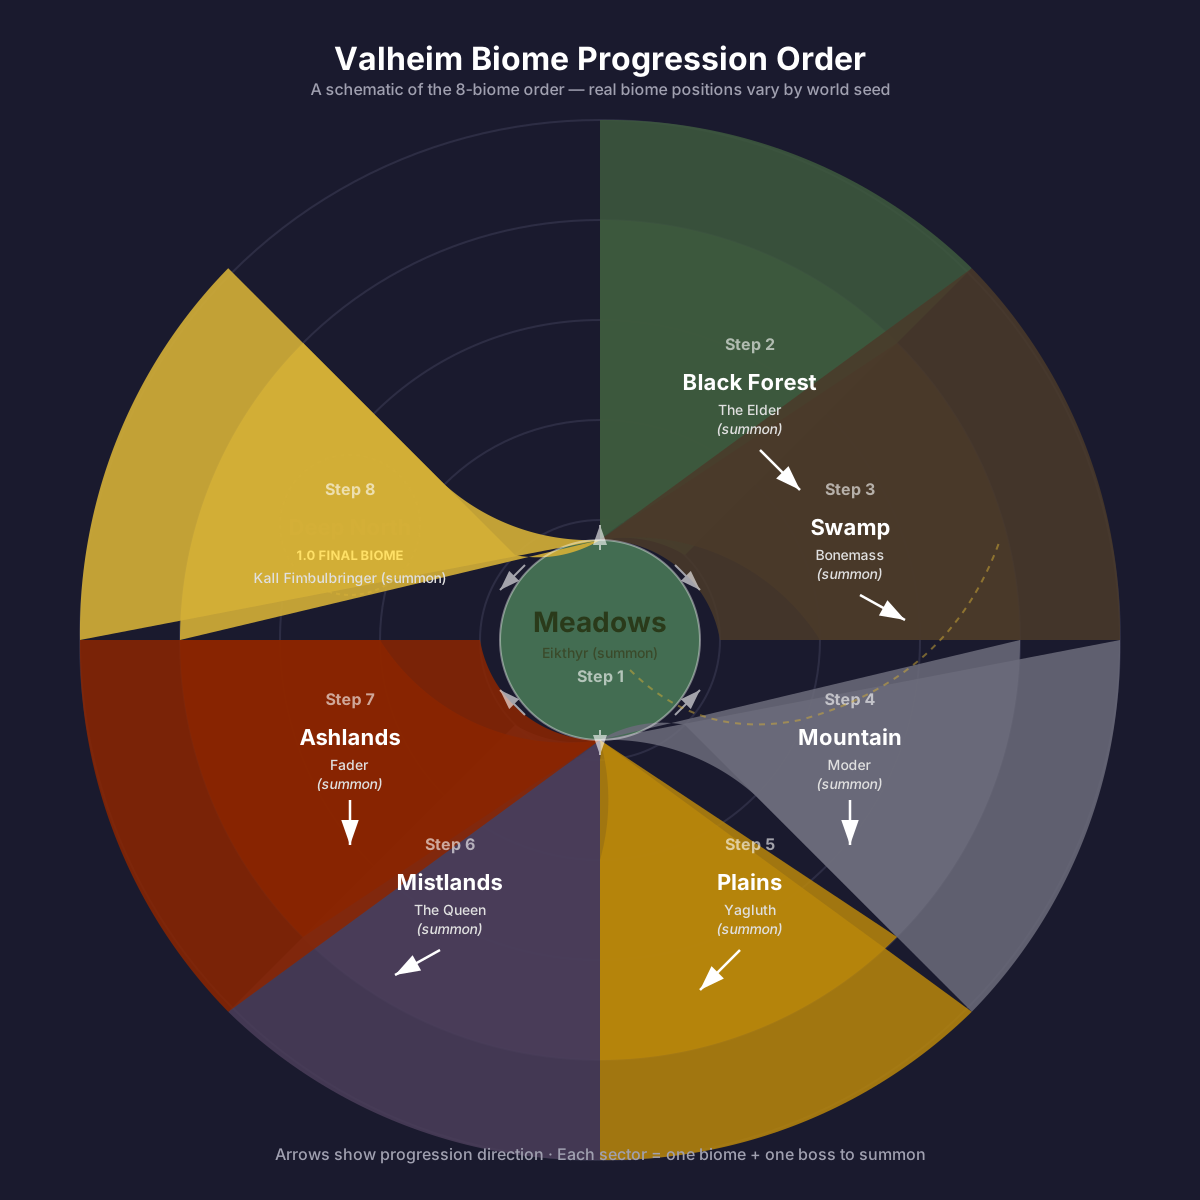
You can tell which biome comes next by what gear your current boss drops. The pattern is: Boss A drops material → gear tier B → gear tier B unlocks weapon for Boss C → repeat.
Stage 1 — Meadows → beat Eikthyr → unlock Bronze
When you arrive
You spawn here. No gear, no base, no resources. This is the only biome you start in.
What to gather
- 5-10 Wood (clubs on trees) for a Campfire + Workbench
- 3-5 Stone (ground pickups) for the Campfire
- 1-2 Deer and 1-3 Boar for food (cooked meat gives 30 health + 25 stamina buff)
- Flint from shorelines — 6 flint for the Flint Axe + Flint Spear + Wooden Shield
The critical mistake new players make
Building their base in a forest of Greydwarves. Greydwarves spawn from un-cleared ground and will attack your workbench at night. Clear a 20x20 flat patch before you build.
What you need before you leave
- Hard Antler — dropped by Eikthyr, used to craft the Antler Pickaxe (your first and only pickaxe until Black Forest)
- Antler Pickaxe crafted — without it you cannot mine Copper or Tin, so you cannot progress past the Meadows at all
- Antler Forsaken Power — activate it at Eikthyr’s altar before you head out
Boss altar location
The Eikthyr stone circle is always on your starter continent. Look for a circle of grey stone pillars with Eikthyr’s antler rune symbol in the middle. Bring 2 Deer Trophies to sacrifice on the Offer Stones.
Biome exit condition
Antler Pickaxe in inventory, Eikthyr killed. Move on to Black Forest — Copper and Tin await (and the portal, which needs Finewood, from birch trees you chop with the pickaxe-mandatory Bronze Axe).
Stage 2 — Black Forest → beat The Elder → unlock Iron
When you arrive
Walk west or east from the Meadows. Black Forest is the dark tree-covered biome with greydwarf spawners and burial chambers.
What to gather
- Copper ore from brown rock clusters — you need ~10 Copper ingots for one full Bronze set
- Tin ore from grey rocks near riverbanks — you need ~10 Tin ingots for one full Bronze set
- Surtling cores from Burial Chambers (dark stone entrances on the ground) — these smelt Copper and Tin
- Greydwarf eyes — you need 10 per portal; you will farm these repeatedly
- Finewood from birch and oak trees (Bronze Axe required)
What you need before you leave
- Iron tier gear — Iron Sword, Iron Pickaxe, Iron Armor set
- A Bronze buckler (skip Wooden Shield, Bronze is the first real parry shield)
- A working portal pair — 20 Finewood + 10 Greydwarf eye + 2 Surtling Cores per portal (Finewood comes from the birch and oak you chop with your Bronze Axe)
- The Elder Trophy and Swamp Key from killing The Elder
- Forsaken Power of The Elder — +60% chopping and pickaxe damage, +30% health regeneration
Boss altar location
The The Elder stone circle has a tree rune symbol. It is always on the next Black Forest landmass from your Meadows spawn — usually a 5-10 minute sail away. Bring 3 Ancient Seeds (dropped by Greydwarf spawners) to sacrifice.
Biome exit condition
Iron gear, Elder Trophy, Swamp Key. Sail to the Swamp — the Swamp Key unlocks the Sunken Crypts where Iron ore lives.
Stage 3 — Swamp → beat Bonemass → unlock Silver
When you arrive
Swamps are purple-grey bogs with sunken stone entrances. They are wet, cold, and full of blobs.
The key mechanic you need to know
The Wet + Cold debuff reduces your stamina regen and health. Cook Boar Meat + Thistle at a Cauldron to make Sausages — they give Warm status and resist the debuff. Or drink Mead: cook Honey + Blueberry + Thistle at a Cauldron, ferment in a Fermenter.
What to gather
- Iron scrap from Sunken Crypts (the stone entrances marked with a skull, unlockable with Swamp Key)
- Withered Bones from blobs and Oozers — you need 10 to summon Bonemass and more for Frost Arrows later
- Oozer sacs from blobs for Withered Bones
- Surtling cores — farm more, you will need them for every smelt
What you need before you leave
- Wishbone — the guaranteed drop from Bonemass (not from Wraiths). Equip it in your tool belt: it pings buried silver deposits in the Mountain. Without it you cannot find silver ore.
- Iron tier gear — Iron Sword, Iron Pickaxe, Iron Armor set
- Wolf pelt from Mountain wolves — needed for the Wolf Cape (brings cold resistance before you step on ice)
- Frost arrows from Withered Bones + Iron — useful for Moder later
- The Bonemass Trophy
- Forsaken Power of Bonemass — 25% resistance to pierce, slash and blunt damage; blocking costs no stamina and returns +5 stamina per block
Boss altar location
Bonemass’s stone circle has a bone rune symbol. It appears inside a swamp zone, so plan your approach — bring Warm food and set up a portal right outside the ring. Sacrifice 10 Withered Bones.
Biome exit condition
Wishbone in tool belt, Iron gear, Bonemass Trophy. Time for the Mountain — the coldest biome and the first one that requires resistance planning.
Stage 4 — Mountain → beat Moder → unlock Black Metal
When you arrive
Mountains are always the tallest landmass on your map. Look for snow-capped peaks rising above everything else.
The key mechanic you need to know
Freezing debuff — you take damage and stamina slows unless you have the Wolf Cape (Silver crafting) or a warm mead. Bring the Wolf Cape before you even step foot on the mountain — Cold damage ticks through health fast.
What to gather
- Silver ore from silver “veins” — use the Wishbone (from Bonemass) to ping their locations; silver is mostly underground and invisible without it
- Wolf pelts — needed for the Wolf Cape and full Wolf Armor set (not required, but Wolf Armor is the best defence before Black Metal)
- Froststones from mountain trolls — you need these for the Frost Arrows
- Dragon eggs — you will need three for Moder’s altar. Each weighs 200 and cannot go through a portal, so carry them on a longship (or use a Megingjord and make repeated trips).
What you need before you leave
- Black Metal tier gear — Black Metal Sword, Black Metal Shield, Black Metal Armor set
- Porcupine (Arbalest) — the best ranged weapon before Mistlands
- Moder Trophy
- Forsaken Power of Moder — a tailwind while sailing (lasts 300s), +300 carry weight, +10% movement speed and 50% frost resistance (game-changing for sailing and hauling)
Boss altar location
Moder’s stone circle has a dragon rune. It is always on a peak — sail your longship as close as you can, then trek up the mountain. Bring 3 Dragon Eggs (from nests on the mountain) and place them in the three offering bowls.
Biome exit condition
Black Metal gear, Moder Trophy, 3 Dragon Eggs. The only way to progress from Mountain to Plains is by longship — the Plains are always on a separate continent from the Mountain. Set up a portal hub at your coast before sailing.
Stage 5 — Plains → beat Yagluth → unlock the path to Mistlands
When you arrive
Plains are yellow-green grasslands with scattered Fuling villages. They are the hardest biome you have seen so far in terms of raw enemy damage.
The key mechanic you need to know
Deathsquitos — tiny flying bugs that hit for 90 pierce damage each (more than most wolves’ melee). One hits you, three more spawn. Carry a shield at all times and prioritize killing them over everything else.
What to gather
- Black metal scrap from Fuling camps — this is your upgrade from Silver gear
- Fuling totems — needed for Yagluth’s altar (5 of them)
- Fuling spears and clubs — Fulings drop them; they are the best early Plains ranged/melee weapons
- Tar from ground tar pits at night
What you need before you leave
- Mistlands gear tier — the whole Mistlands progression unlocks after Yagluth
- Yagluth Trophy
- Forsaken Power of Yagluth — 50% lightning resistance, +25 Farming skill and +10% damage
Boss altar location
Yagluth’s stone circle has a fire rune. It is always in the middle of a Plains zone, usually near several Fuling villages. Clear the villages first or you will fight Yagluth with Fulings spawning behind you. Sacrifice 5 Fuling totems.
Biome exit condition
Black Metal gear, Yagluth Trophy. The Mistlands are always the farthest-out named biome from your Meadows spawn — set sail and look for fog.
Stage 6 — Mistlands → beat The Queen → unlock Ashlands access
When you arrive
Mistlands are covered in permanent fog. You cannot see 10 feet ahead without the Wisplight.
The key mechanic you need to know
Wisplight — you need this to see anything in the Mistlands. Craft it from 1 Wisp + 1 Silver. You catch Wisps near a Wisp Fountain (built at a Stonecutter: 10 Stone + 1 Torn Spirit from Yagluth). Catch Wisps at night — the fountain glows and Wisps spawn around it. Place the Wisplight in your accessory slot; it clears fog in a ~10-meter circle around you. Without it, the Mistlands are unplayable — you will fall off cliffs, get ambushed by Seekers, and die to things you cannot see.
What to gather
- Black marble — mined from Mistlands rock formations (pickaxe only, no chop)
- Sap and Eitr — Sap Extractors on Yggdrasil trees yield Sap, which you refine with Soft Tissue at an Eitr Refinery into Refined Eitr — the fuel for the Galdr Table and all magic gear
- Seeker cores — dropped by Seekers, needed for some crafting recipes
What you need before you leave
- Mistlands magic gear — Staff of Embers, Staff of Frost, Magician Armor
- The Queen Trophy
- Forsaken Power of The Queen — +100% Eitr regeneration, sneaking costs no stamina and 50% poison resistance
Boss altar location
The Queen has no open altar — she waits inside the Infested Citadel, a sealed Mistlands dungeon whose location a Vegvisir in the Infested Mines reveals. Open the citadel door with a Sealbreaker (crafted from 9 Sealbreaker Fragments found in the mines’ display cases); the first fight costs nothing else. To fight her again, offer 3 Seeker Soldier Trophies at her altar inside.
Biome exit condition
Mistlands magic gear, Queen Trophy. The Ashlands are the next step — sail to the south.
Stage 7 — Ashlands → beat Fader → unlock Deep North access
When you arrive
Ashlands are a volcanic red biome full of charred trees, Surtlings and the Fader. This is the second-to-last biome before Deep North.
The key mechanic you need to know
Fire damage is everywhere — standing in lava takes damage, cinders rain from the sky and burn what they hit, and wooden structures catch fire and spread. Bring Fire Resistance Barley Wine (10 Barley + 10 Cloudberries, cooked at a Mead Ketill and fermented in a Fermenter) before stepping foot in the Ashlands.
What to gather
- Flametal ore — the final metal tier; mined from rock deposits across the Ashlands
- Portal Stone — a more durable alternative portal (30 Grausten + 10 Greydwarf Eye + 2 Molten Cores, built at a Stonecutter)
What you need before you leave
- Ashlands gear tier — full Ashlands set + Black Metal weapon upgrade
- Fader Relic × 5 — used to craft the Eternal Pyre (10 Stone + 1 Fader Relic at Stonecutter), which produces Embers for the Deep North progression. This is the gate into the Deep North.
- Forsaken Power of Fader — +100% Adrenaline generation, 50% reduced stagger and 50% fire resistance
Boss altar location
Fader’s altar is a coliseum whose location a Vegvisir in a Charred Fortress reveals. Summon him with 3 Bells (crafted from 9 Bell Fragments), then fight him inside the ring. Bring fire resistance mead and set up a portal close by.
Biome exit condition
Ashlands gear, Fader Relic × 5. Deep North is the final biome — sail to the north.
Stage 8 — Deep North → beat Kall Fimbulbringer → finish the game
When you arrive
Deep North is the final biome of Valheim 1.0. It is the farthest-out landmass from your Meadows spawn, usually a long sail past all other biomes.
What the final stage looks like
- Snow as a mechanic — clear snow drifts before building, walking on ice slows you down
- Ashwood and Timberwood — the new 1.0 building materials (non-flammable)
- Seals, Moose, Barka, Gammeltrolls, Elaking, Eyeless Ones, Krigen and Hexen — the new enemy types and wildlife
- Nord and Frostfire weapon tiers — new weapons for the Deep North progression
- Kall Fimbulbringer — the 1.0 final boss, reached through the Aesir Passage
- 1.0 achievement system is fully tied to Deep North content
How the final boss works
Kall Fimbulbringer is the frost giant who serves as the game’s final boss. He has three phases (roughly 10,000 / 7,000 / 30,000 HP) and is reached through the Aesir Passage, a sealed Deep North structure found via a Vegvisir in Mörkhalla. After the first phase he hides inside an invincible block of ice while the spirits of the previous bosses (Eikthyr, The Elder & Bonemass together, then Moder, Yagluth, The Queen and Fader, in that order) are summoned, and only once all of them fall does the ice shatter for the final phase. To summon him you feed 3 Malicious Blood into the Strange Bowl at the passage — each one comes from completing a Jotun invasion, which you trigger by breaking the Malicious Ice in a Mörkhalla dungeon (unlocked with an Intricate Key). The fight requires the Deep North crafting chain (Frostcore, Bloodgold, the Frost Foundry and Frigid Kiln) and the Malicious Ice must be destroyed to start the invasion (a pickaxe works, though any damage type will do). Kall resists pierce, fire, frost and lightning and is immune to spirit, so blunt and slash are your reliable damage; he drops Sacrificial Blood (and a Crown Jewel).
What to gather
- Frostcore — new Deep North ore, used for the Frigid Kiln and Frost Foundry
- Malicious Ice — found at the center of the bottom floor of Mörkhalla; breaking it triggers the Jotun invasion
- Moose hide, Seal pelt, Elaking hair, Petrified Tissue — new resource drops
- Hook — grappling hook for Deep North traversal
- Fader Relic × 5 from Ashlands — used to build the Eternal Pyre, which produces the Embers needed for Ember Charges. You must have beaten Fader before the Deep North progression opens.
Biome exit condition
Deep North boss killed, full progression complete. You have now beaten every major challenge Valheim 1.0 offers.
The six most common traps that stall new players
Trap 1 — No bronze axe, therefore no Finewood, therefore no portals
Bronze Axe → Finewood → portal pair. The whole chain locks new players out of fast travel. Do not spend 30 minutes chopping trees with flint — get the bronze axe first.
Trap 2 — Build base in Greydwarf territory
Greydwarves spawn from un-cleared ground and attack your workbench at night. Clear a 20x20 flat patch before you place the first workbench. This is the #1 reason new players quit Valheim on day 1.
Trap 3 — Try to portal with Dragon Egg
Dragon Egg blocks teleportation. You must sail it on a longship. Mistakes happen — pick the egg up from the dragon nest, walk back to your portal… portal denies you, you have to run all the way back to your longship.
Trap 4 — Wet + Cold debuff before Wolf Cape
Walking into the Swamp or Mountain without the right food makes you lose stamina and health at the same time. This is the #2 reason players die to early biome bosses. Bring Sausages to Swamp, bring Wolf Cape to Mountain.
Trap 5 — Three portals with the same tag
Four portals with the same tag = 1-2 pair, 3-4 pair. But three portals? 1-2 pair, 3 goes dark. Players stare at a dead portal for 10 minutes before figuring this out.
Trap 6 — Skip Moder before Plains
Moder drops the Dragon Egg you already used and gives you the Moder Forsaken Power (a tailwind while sailing, lasting 300s, +300 carry weight). You need both to make the long sail to Plains. Skipping Moder means fighting Yagluth with Silver gear — possible but much harder.
Links
- first-two-hours-roadmap — the time-bounded checklist from spawn to Eikthyr kill
- portal-network-guide — how to design a usable fast-travel hub
- meadows-overview — your first biome in detail
- eikthyr — full boss page with summon recipe and patterns
Related guides
- Valheim Mistlands Guide — Wisplight, Eitr Magic, Dvergr and The Queen
The full Mistlands guide for Valheim 1.0: the Wisplight and Wisp Torch system to beat permanent fog, building the Eitr Refinery and Galdr Table for magic, raiding Dvergr Settlements for Extractors and Soft Tissue, and fighting The Queen with Sealbreaker Fragments.
Verified Valheim 1.0 - Valheim Ocean Guide — Boats, Wind, Serpents and Leviathans
How the Valheim ocean works: the four boats and what each is for, reading the wind indicator and tacking, surviving Sea Serpents, mining Leviathans for chitin, and why ore has to be sailed home.
Verified Valheim 1.0 - Valheim Meadows Guide — Spawn, First Tools, Base Building and Eikthyr
The full Meadows guide for Valheim 1.0: your first 30 minutes from spawn to Flint tools, why clearing Greydwarves before building is non-negotiable, how to hunt Deer and Boar efficiently, summon Eikthyr with 2 Deer Trophies, and prepare for the Black Forest.
Verified Valheim 1.0